
Making a Worm Farm is a great and simple way to turn your scraps and rubbish into free food for your vegetable garden, and it’s simple to make yourself at home. There are so many methods you can use it can be an inexpensive, fun and environmental activity for the whole family!
What you can:
Newspaper, Paper, Tissues, Toilet Rolls, Vegetable Scraps, A Small amount of bread and pasta, Tea bags, Egg Shells, Coffee Grounds.
& can’t add the worm farm:
Onion, Spring onion, Leeks, Citrus, Cat or Dog faeces
*TIP- Try and rip up the paper and put smaller sized pieces of food in for the worms to be able to eat it easier.
How to make the worm farm
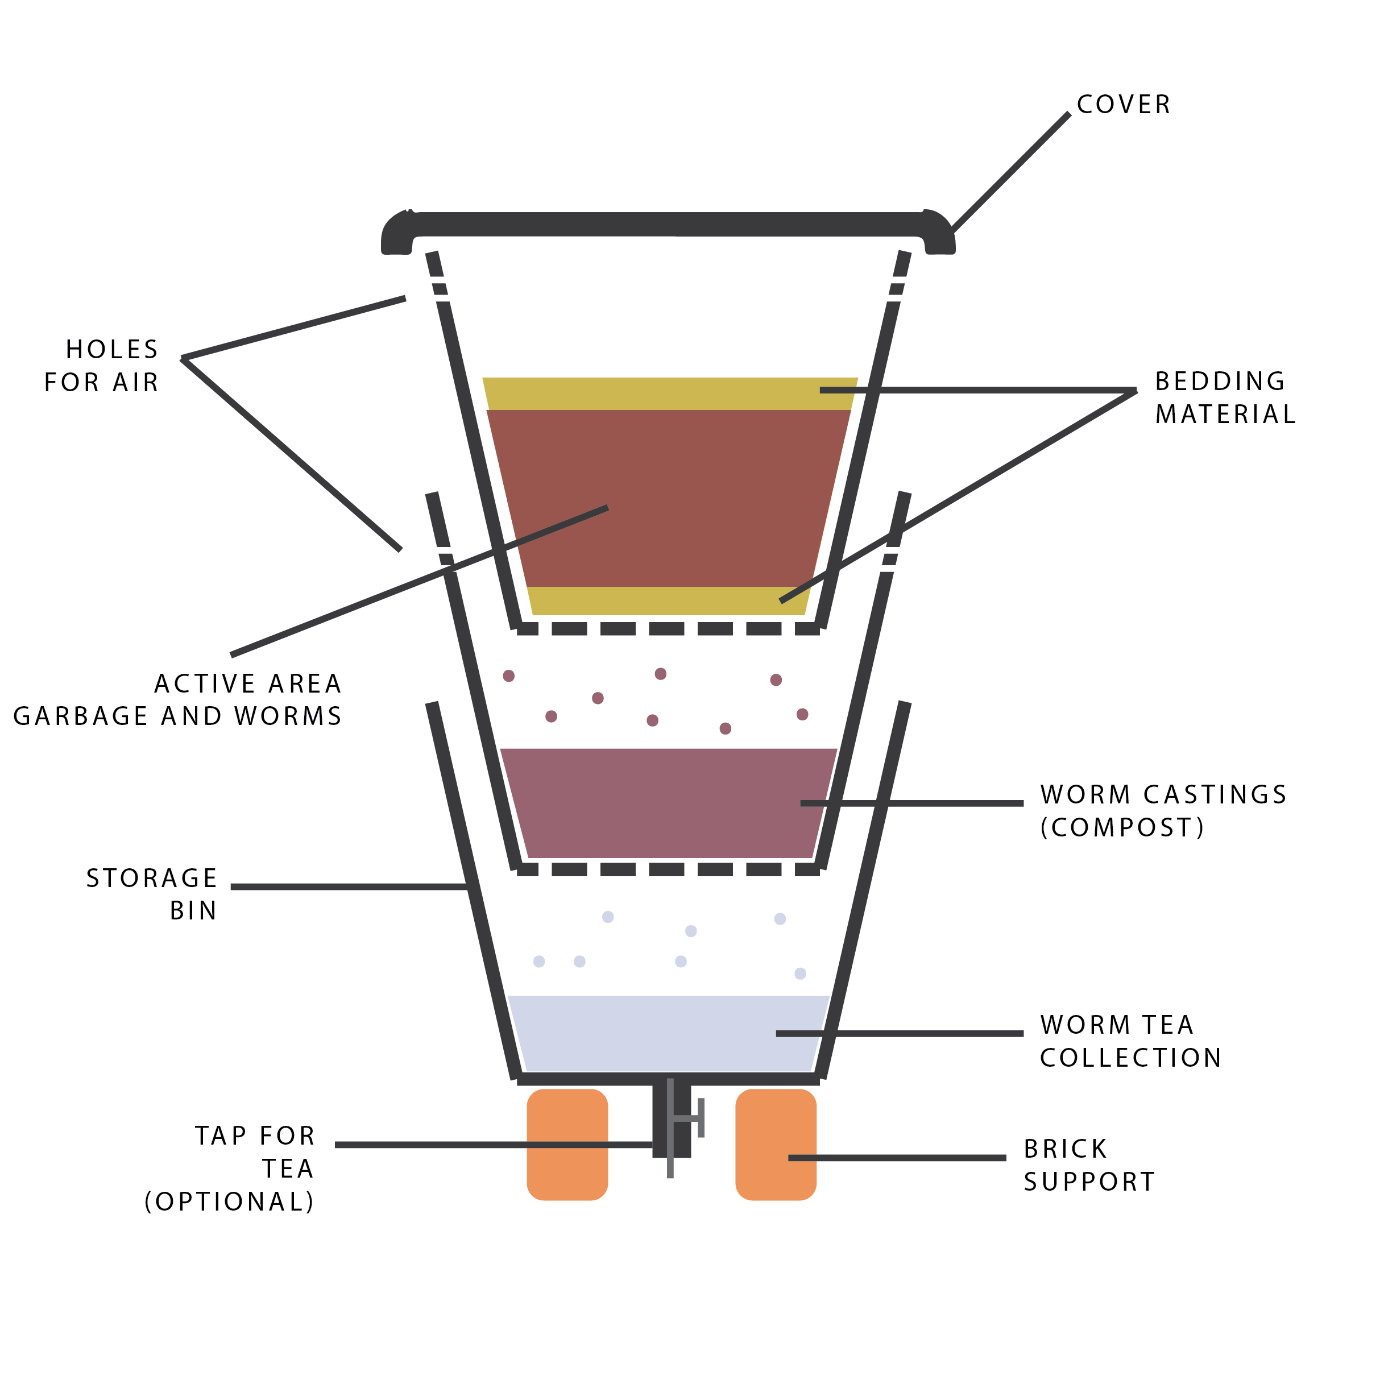
Method- The basic setup involves 3 chambers on top of one another with holes in the bottom to allow the worms to move around freely. In the top chamber goes your scraps and the middle chamber is the worm castings, then below that, the worm wee is collected and drained out of a tap or drain for you to collect and use in the garden! Just make sure your container is dark, as worms don’t like light. Also, consider putting a few air holes in the middle if you feel air flow is needed in your chosen vessel.
*Tip-The worm farm must never be allowed to dry out, but don’t let it get boggy either.
Step One- Create your boxes, Leave the Top layer off at this stage but make sure it has a lid.
Step Two- Add your worms to the middle chamber in good amounts of coconut coir or shredded newspaper, add some compost or garden soil as well. Ideally 1 part of each but if you’re missing some components it will still work. Add some food scraps over the top and cover with an old damp towel, or geofabric, or any fabric. Be sure to keep the fabric moist with a daily light watering.
*Tip- You can line the box with shade cloth if your holes are a bit big.
Step Three- Once the middle layer if full, you can add the top chamber. Just remove the fabric and place the box on top with the holes in the bottom resting gently on top of the worms, Repeating the process from step two into the top box, but using some of the vermicompost (worm castings) from the existing chamber.
Step Four- Add the vermicompost that is collected in the middle chamber to the garden each season for an amazing boost to your garden. Alternating the top and middle chambers as they fill up.
Some ideas for your set up.
- Polystyrene boxes
- Plastic Tubs
- Rubbish Bins
- Baths
- Sinks
- Fridges
As long as that principle method is there you can use almost anything!
Where you should keep your worm farm
Worms don’t like light or heat so keep it somewhere cool and out of the sun. I think it’s handy to keep them close to the back door so you can easily take your scraps out and water it each day. It’s a great job for the children too mums and dads!
Will it attract other bugs to the area?
No, the worms will eat the food quickly enough so that other bugs and vermin will not be an issue.
Breaking a myth
Oh, and for the record, worms do not multiply when you cut them in half. So please just go out and purchase some worms, don’t go cutting up your garden worms!! You will need around 1000 worms per 1-2 peoples worth of scraps.
Need more info?
If you would like any more information or guidance on setting up a worm farm at your place, or if you would like to book in a make a worm farm workshop for your community group then please get in touch with us today. Also if you found this useful please share this post 😊
Written By Carla Weir from Gaias Organic Gardens 2017